Once you determine a model’s size and position in the workspace, you can change and adjust all parameters influencing a model’s quality and durability, such as the layer thickness, the type and density of infill or the fan speed. The Print settings menu is divided into Normal and Advanced settings. This part of the Z-SUITE 2 manual will walk you through all available options for the FDM and UV LCD technology. The remaining parts of the manual are available at: Basic Features, Working with Models, Support Adjustments, Tips & Tricks.
Normal Print Settings (FDM)
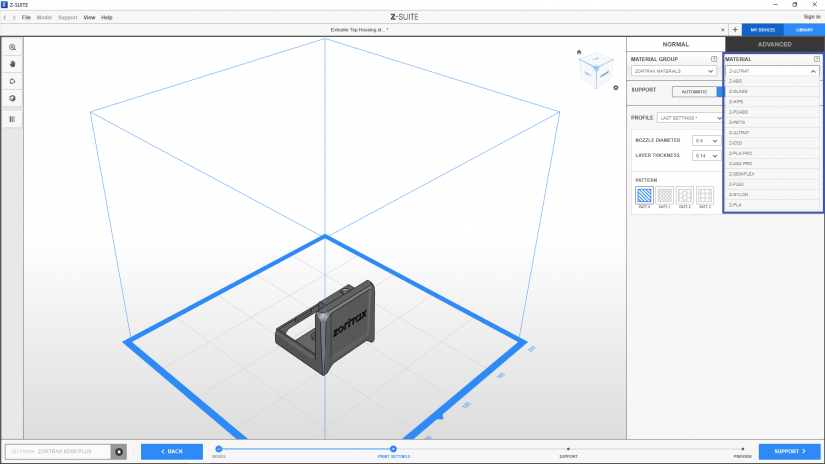
1. First, select the Material group, and then select the material you're going to use for 3D printing from the drop-down list.
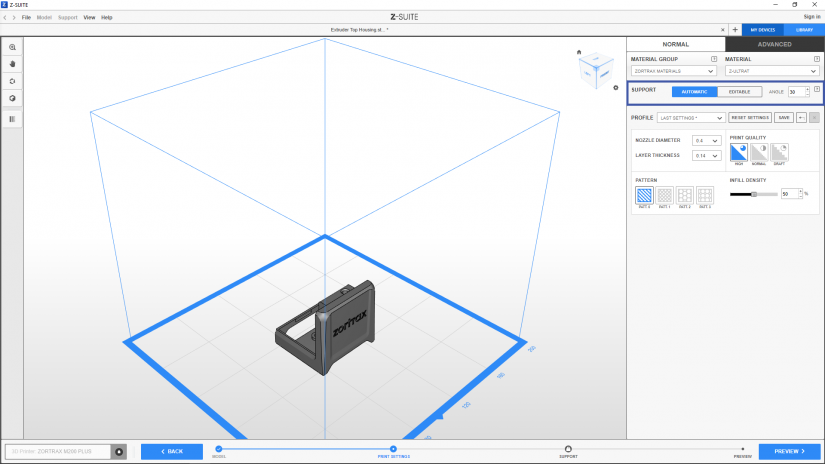
2. Next, choose the type of support structures you're going to generate: AUTOMATIC or EDITABLE.
Once you select the AUTOMATIC option, the Support step will be disabled and the program will automatically generate support structures in the Preview step. However, if you choose the EDITABLE option, you will be able to add and edit support structures in the next step. More details are provided in the Support Adjustments article.
1. First, select the Material group, and then select the material you're going to use for 3D printing from the drop-down list.
2. Next, choose the type of support structures you're going to generate: AUTOMATIC or EDITABLE.
Once you select the AUTOMATIC option, the Support step will be disabled and the program will automatically generate support structures in the Preview step. However, if you choose the EDITABLE option, you will be able to add and edit support structures in the next step. More details are provided in the Support Adjustments article.
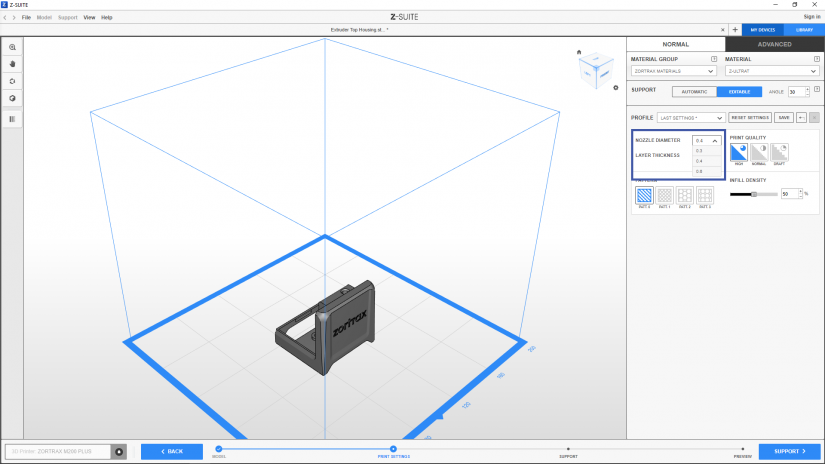
3. In this menu, you can also select the Nozzle diameter. The default diameter is 0.4 mm [0.016 in]. Remember that the selected diameter must correspond with the nozzle installed in the printer.
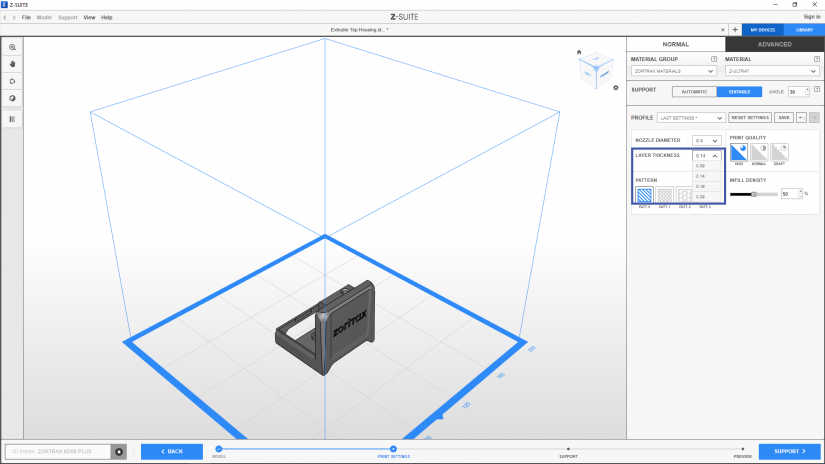
1. Next, set the Layer thickness with which you are going to print your model. This parameter determines the height of each layer. You can choose from 0.09 mm/0.14 mm/0.19 mm/0.29 mm/0.39 mm, depending on the material and printer model. Finer layers provide better surface quality but make the printing process more time-consuming.
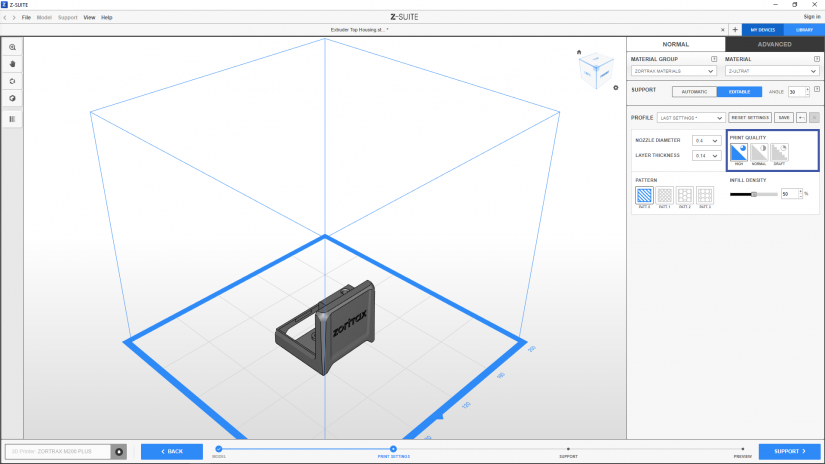
2. You can also choose the Print Quality. Depending on the printer model, there are three available options: HIGH, NORMAL, and DRAFT. High quality gives better-looking prints but increases the print time. The Draft option is recommended for test prints as it speeds up the printing process.

3. Next, choose the type and density of Infill for your model. You can select from four infill patterns: linear (Patt 0), grid (Patt 1), honeycomb (Patt 2) and octagonal (Patt 3). Infill density can be increased by adjusting the slider (from 10 to 90%). The more infill you choose, the more material will be used during the printing process and it will take more time to print your model.
1. Next, set the Layer thickness with which you are going to print your model. This parameter determines the height of each layer. You can choose from 0.09 mm/0.14 mm/0.19 mm/0.29 mm/0.39 mm, depending on the material and printer model. Finer layers provide better surface quality but make the printing process more time-consuming.
2. You can also choose the Print Quality. Depending on the printer model, there are three available options: HIGH, NORMAL, and DRAFT. High quality gives better-looking prints but increases the print time. The Draft option is recommended for test prints as it speeds up the printing process.
3. Next, choose the type and density of Infill for your model. You can select from four infill patterns: linear (Patt 0), grid (Patt 1), honeycomb (Patt 2) and octagonal (Patt 3). Infill density can be increased by adjusting the slider (from 10 to 90%). The more infill you choose, the more material will be used during the printing process and it will take more time to print your model.
Model Analysis (FDM)
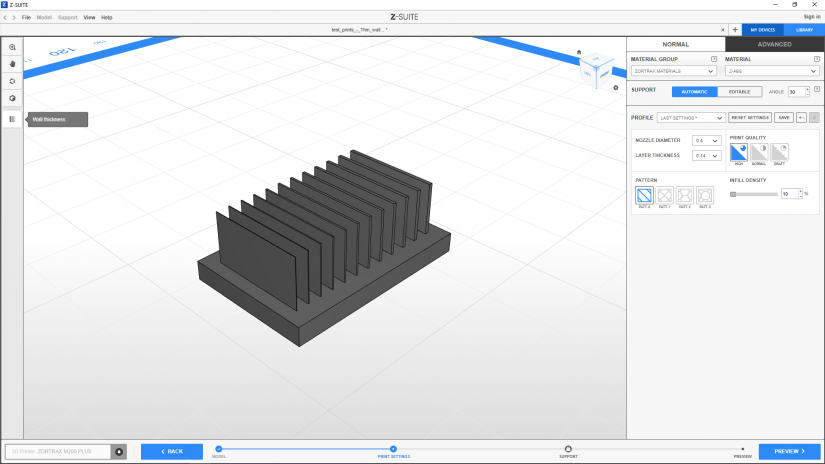
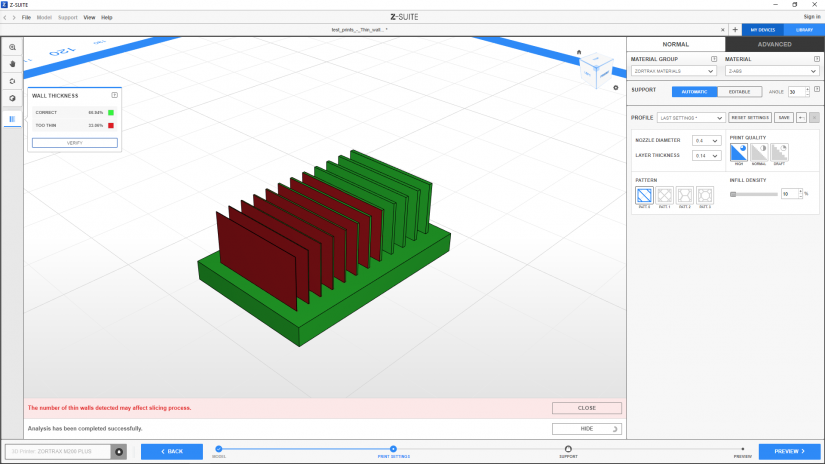
Z-SUITE 2 is able to check whether a model has walls which are too thin to be printed and mark them in the preview. In the Print settings step, click the last icon on the left bar. Select Verify and the program will carry out the analysis.
If after the analysis your model has sections marked red, it means that there are walls thinner than 0.4 mm and, due to the minimum wall thickness requirements of Zortrax printers, may not be printed at all.
Once you generate the .zcode/.zcodex, those non-printable structures won’t be included in the preview. If you encounter problems with too thin walls but you don’t want to give up on 3D printing that particular model, use 3D modeling software to correct the model’s structure prior to loading it into Z-SUITE 2. Using this option is optional – if you’re sure your piece is well-designed, you can move on to the next step of preparing a model.
Advanced Print Settings (FDM)
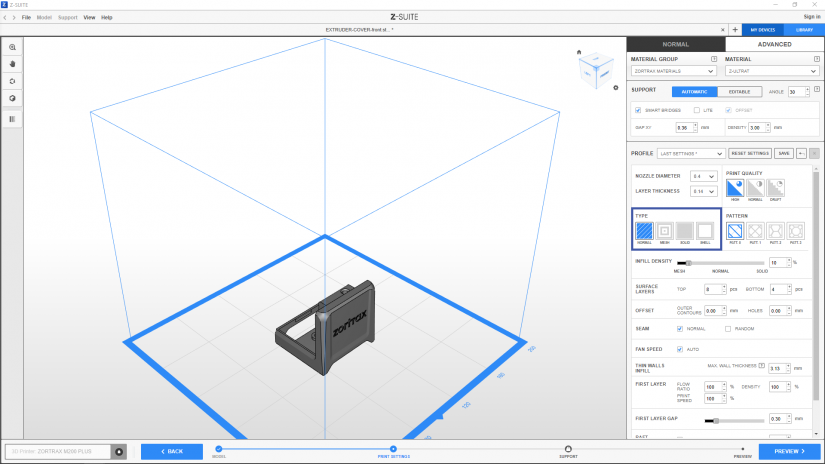
1. There are four additional types of infill you can choose from: Normal, Mesh, Solid, and Shell.
Models with the SOLID type will have full infill density (100%), whereas with the MESH type will have no infill density (0%). There is also the SHELL option which prints models without top and bottom surface layers (bottom ones are optional) and 0% infill density. You can still choose the number of walls (up to 3). The SPIRAL MODE prints models with no seam.
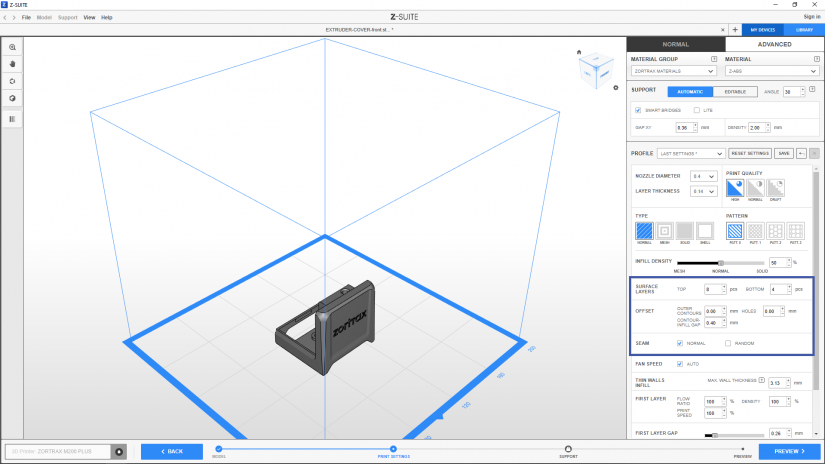
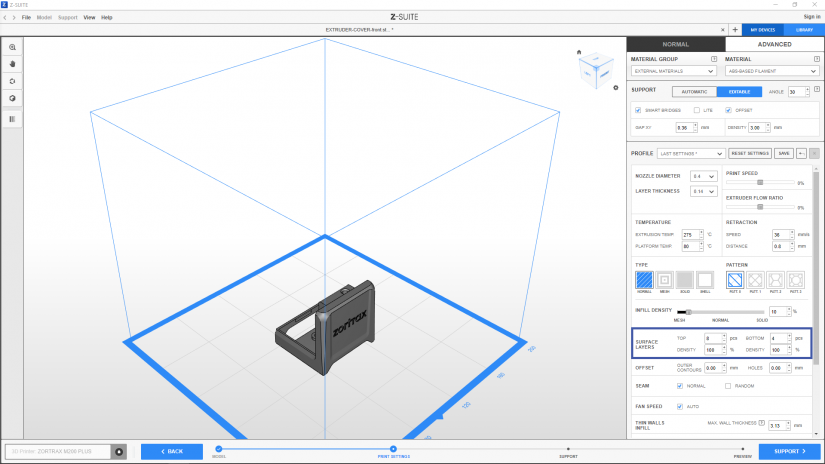
2. Next, you can determine the number of SURFACE LAYERS. Increase the top and bottom surfaces if you print models with lower infill density to make them slightly more durable.
There are three options available in the Offset section:
- Outer contours allows you to increase the outer dimensions of a model (up to 1 mm),
- Holes allows you to increase the internal dimensions of holes (up to 1 mm),
- Contour-infill gap allows you to change the space between outer contours of a model and outer contours of infill, and thanks to that, make bonding between outer walls and infill stronger.
Here you can also choose the type of SEAM. It is the starting point of each new layer, which appears as a slightly visible mark on the surface of models. It can be either normal (the same point on each layer) or random (different point on each layer).
1. There are four additional types of infill you can choose from: Normal, Mesh, Solid, and Shell.
Models with the SOLID type will have full infill density (100%), whereas with the MESH type will have no infill density (0%). There is also the SHELL option which prints models without top and bottom surface layers (bottom ones are optional) and 0% infill density. You can still choose the number of walls (up to 3). The SPIRAL MODE prints models with no seam.
2. Next, you can determine the number of SURFACE LAYERS. Increase the top and bottom surfaces if you print models with lower infill density to make them slightly more durable.
There are three options available in the Offset section:
- Outer contours allows you to increase the outer dimensions of a model (up to 1 mm),
- Holes allows you to increase the internal dimensions of holes (up to 1 mm),
- Contour-infill gap allows you to change the space between outer contours of a model and outer contours of infill, and thanks to that, make bonding between outer walls and infill stronger.
Here you can also choose the type of SEAM. It is the starting point of each new layer, which appears as a slightly visible mark on the surface of models. It can be either normal (the same point on each layer) or random (different point on each layer).
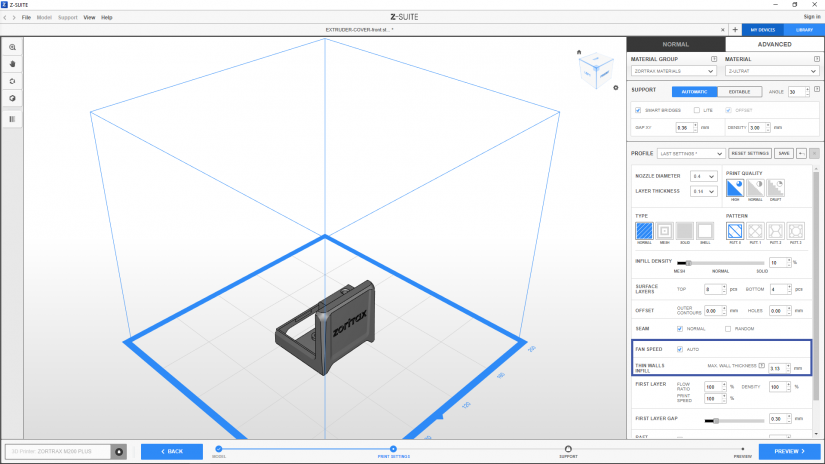
1. Next, you can set the Fan speed. Higher fan speed values are recommended for small prints with thin parts, whereas lower values are recommended for big prints without thin sections. Check the AUTO option and the program will adjust the fan speed according to the size of your print.
The Thin Walls Infill option allows you to determine which walls in your model will be recognized as thin - Max. Wall Thickness by default lower than 3.13 mm. These walls will have denser and more durable infill, but the program will take more time to generate them and their print time will be increased. Walls with thickness higher than the default value will be printed with infill of standard durability.
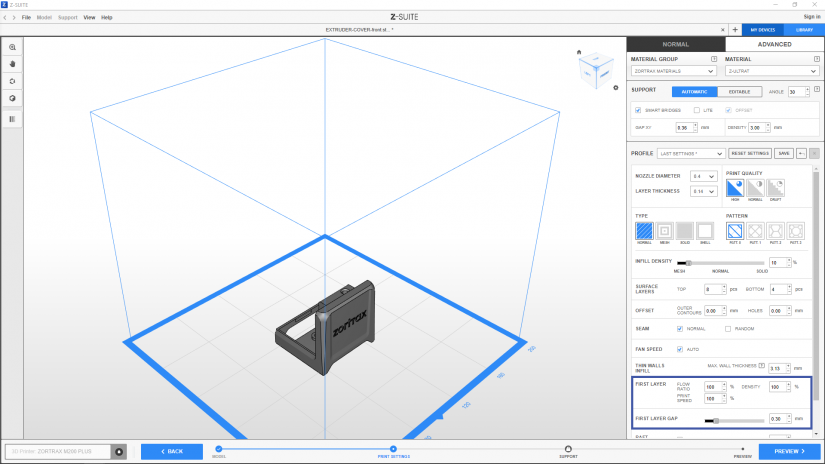
2. There are also several options which can help you modify the first layer of your prints:
Flow ratio - increases the amount of extruded material while printing the first layer,
Print speed - increases the speed of extruder movements while printing the first layer,
Density -increases the density of material paths in the first layer.
You can also use the First layer gap option which sets a gap between the raft and the first layer of a model. Once you increase the first layer gap value, the adhesion between the raft and the first layer will be less strong, and as a result, it will be easier for you to separate the raft from the model after the printing process.
1. Next, you can set the Fan speed. Higher fan speed values are recommended for small prints with thin parts, whereas lower values are recommended for big prints without thin sections. Check the AUTO option and the program will adjust the fan speed according to the size of your print.
The Thin Walls Infill option allows you to determine which walls in your model will be recognized as thin - Max. Wall Thickness by default lower than 3.13 mm. These walls will have denser and more durable infill, but the program will take more time to generate them and their print time will be increased. Walls with thickness higher than the default value will be printed with infill of standard durability.
2. There are also several options which can help you modify the first layer of your prints:
Flow ratio - increases the amount of extruded material while printing the first layer,
Print speed - increases the speed of extruder movements while printing the first layer,
Density -increases the density of material paths in the first layer.
You can also use the First layer gap option which sets a gap between the raft and the first layer of a model. Once you increase the first layer gap value, the adhesion between the raft and the first layer will be less strong, and as a result, it will be easier for you to separate the raft from the model after the printing process.

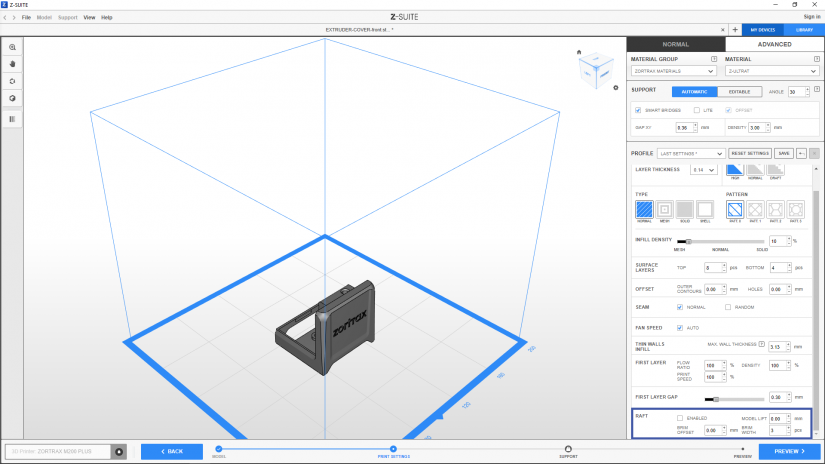
1. Additionally, Z-SUITE allows you to enable or disable printing RAFT - the first few layers of material that start the whole printing process - and customize its settings:
Layers - sets the number of layers needed to print the raft,
Platform-raft gap - sets a gap between the platform and the raft to facilitate model's removal after printing,
Density - increases the density of material paths in the raft,
Print speed - increases the speed of extruder movements while printing the raft,
Flow ratio - increases the amount of extruded material while printing the raft.
2. Once you opt for raftless printing, but you still want to provide your model with more stability and protection against warping during the printing process, you can customize the settings of the BRIM. It is a layer of material that surrounds the model and is printed along with the model’s first layer.
Brim offset - sets a gap between the brim and the model.
Brim width - sets the number of paths that will constitute the brim*.
Model lift - determines the distance between the model along with the brim and the platform (this option is helpful while using additional plates).
*can be set to 0, which means that the model will be printed with no brim.
External Materials Settings (FDM)
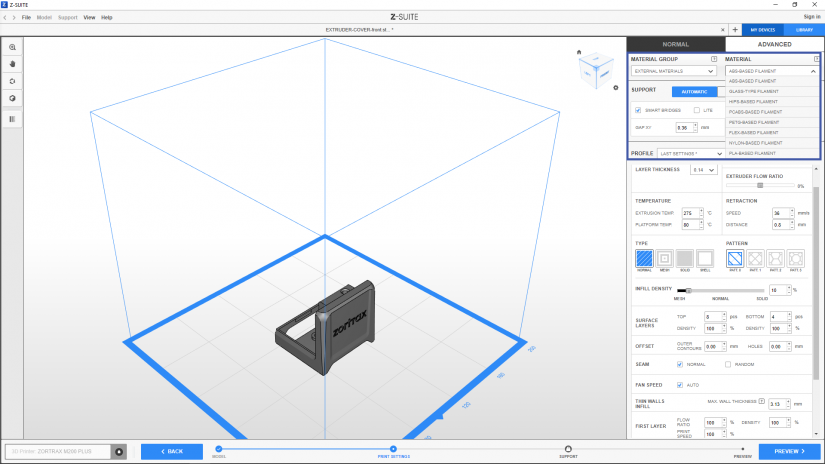
1. If you’ve decided to use non-Zortrax materials, change the material group to External Materials in the Advanced settings menu. First of all, choose the material you're going to use from the drop-down list. The default settings are the most recommended for the selected material type. However, these settings can still adjusted differently, according to specific requirements.
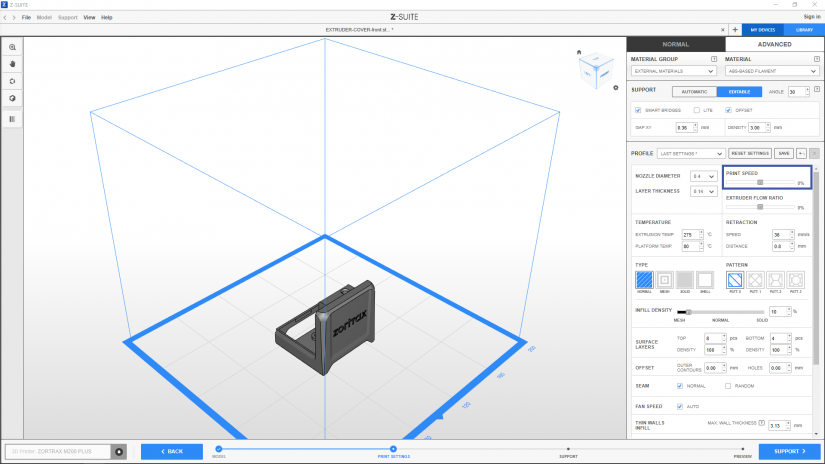
2. Print Speed – a percentage (within limits) by which the print speed will be increased. The print speed includes the speed of printing particular layers, their contours and infills [-50 - 50%].
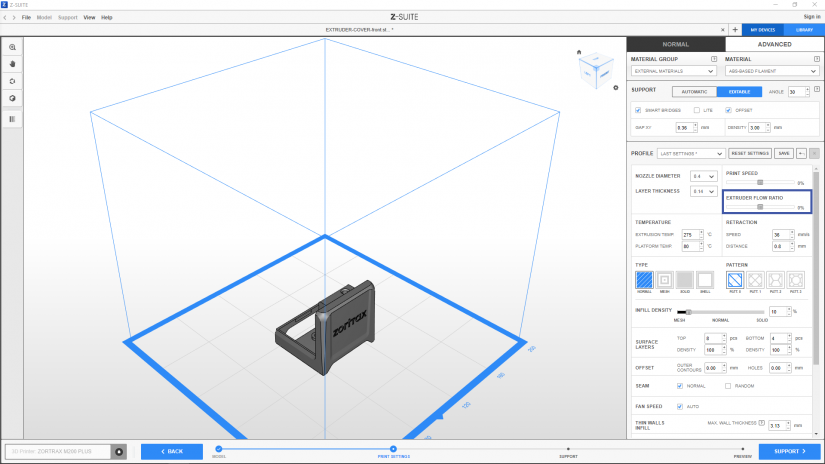
3. Extruder Flow Ratio – a percentage (within limits) by which the speed of material extrusion will be increased. The extruder flow ratio includes the speed of material extrusion for particular layers, their contours and infills [-50 - 50%].
4. Surface layers – the number of TOP and BOTTOM layers and their density [50 - 150%]. The default value is 100%.
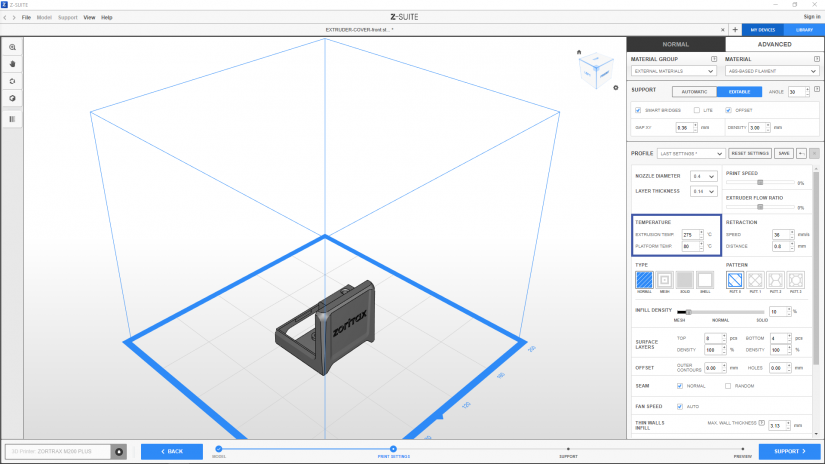
5. Temperature:
- Extrusion temp. (° C) - The temperature of material during extrusion [160 - 290° C]
- Platform temp. (° C) - The temperature of the platform [30 - 105° C].
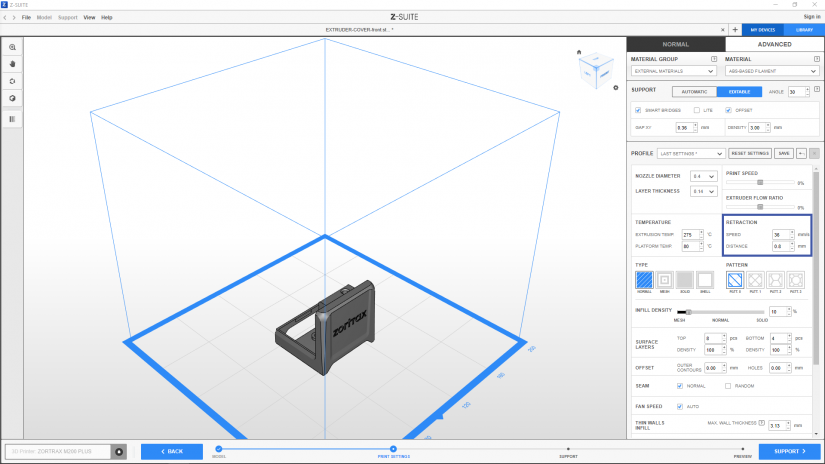
6. Retraction – settings which determine how much of the material is pulled back into the nozzle by the extruder motor during non-print movements of the extruder to prevent stringing and oozing:
- Speed - the speed at which the extruder motor will retract the material,
- Distance - the length of the retracted material.
1. If you’ve decided to use non-Zortrax materials, change the material group to External Materials in the Advanced settings menu. First of all, choose the material you're going to use from the drop-down list. The default settings are the most recommended for the selected material type. However, these settings can still adjusted differently, according to specific requirements.
2. Print Speed – a percentage (within limits) by which the print speed will be increased. The print speed includes the speed of printing particular layers, their contours and infills [-50 - 50%].
3. Extruder Flow Ratio – a percentage (within limits) by which the speed of material extrusion will be increased. The extruder flow ratio includes the speed of material extrusion for particular layers, their contours and infills [-50 - 50%].
4. Surface layers – the number of TOP and BOTTOM layers and their density [50 - 150%]. The default value is 100%.
5. Temperature:
- Extrusion temp. (° C) - The temperature of material during extrusion [160 - 290° C]
- Platform temp. (° C) - The temperature of the platform [30 - 105° C].
6. Retraction – settings which determine how much of the material is pulled back into the nozzle by the extruder motor during non-print movements of the extruder to prevent stringing and oozing:
- Speed - the speed at which the extruder motor will retract the material,
- Distance - the length of the retracted material.
Normal Print Settings (UV LCD)

1. For the UV LCD technology, at first select the Material. Choose the resin type you're going to use from the drop-down list.
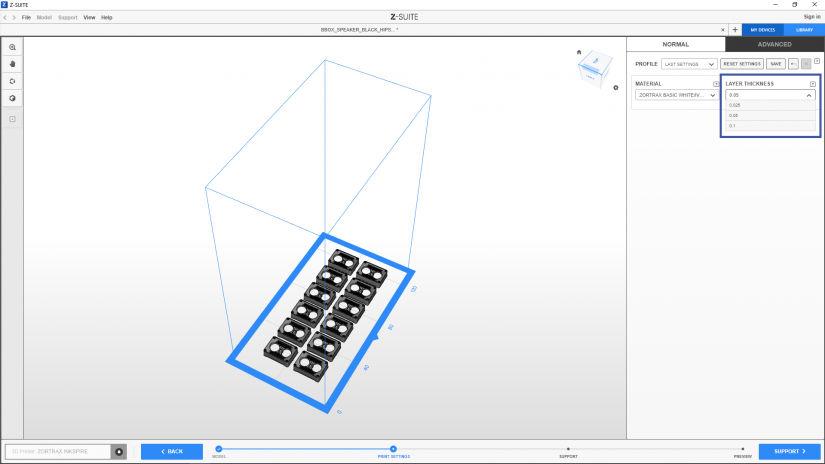
2. Next, set the Layer thickness with which you are going to print your model. This parameter determines the height of each layer. You can choose from 0.025 mm/0.05 mm/0.1 mm. Finer layers provide better surface quality but make the printing process more time-consuming.
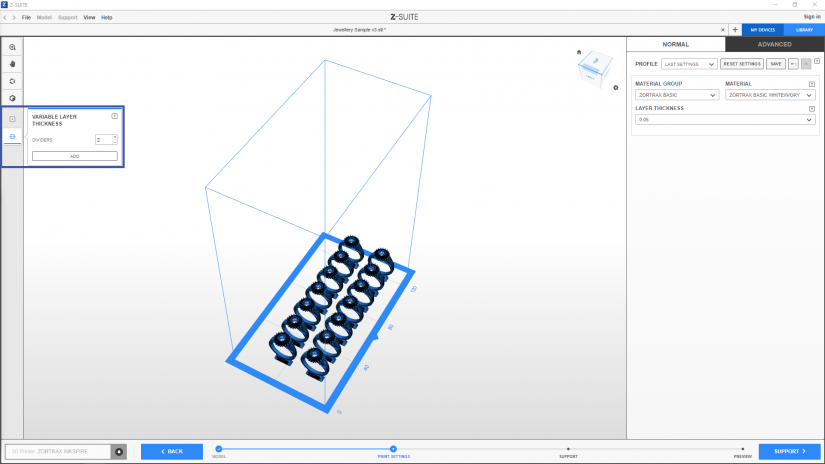
3. If you want to print your item with thicker and finer layers interchangeably, select the last icon on the toolbar on the left. The Variable Layer Thickness option allows you to divide models into one or more areas, each of which can be printed with different layer thickness settings. Detailed instructions and examples are available in the dedicated manual.
1. For the UV LCD technology, at first select the Material. Choose the resin type you're going to use from the drop-down list.
2. Next, set the Layer thickness with which you are going to print your model. This parameter determines the height of each layer. You can choose from 0.025 mm/0.05 mm/0.1 mm. Finer layers provide better surface quality but make the printing process more time-consuming.
3. If you want to print your item with thicker and finer layers interchangeably, select the last icon on the toolbar on the left. The Variable Layer Thickness option allows you to divide models into one or more areas, each of which can be printed with different layer thickness settings. Detailed instructions and examples are available in the dedicated manual.
Advanced Print Settings (UV LCD)

1. In the Advanced print settings menu, you can enable or disable printing the raft and customize its settings: Raft height and Raft offset.
The Raft offset option allows you to determine the size of the area underlying a single pillar of support. More details on adding support structures in the UV LCD technology can be found in the Support Adjustments article.
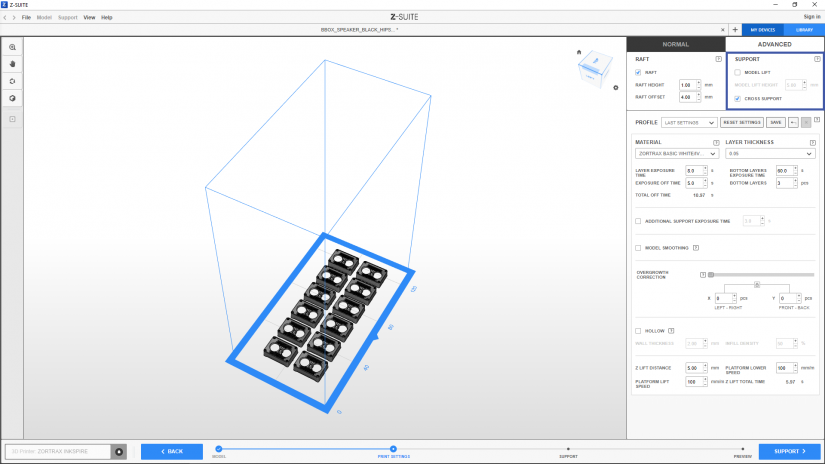
2. In the Support section, you can adjust additional settings connected with support structures:
Model lift - this parameter determines the distance between a model and the platform. Once you select this option, select at what height you want to your model to be lifted. Remember to add support under the model in the Support step.
Cross support - if you select this option, support structures in your model will be reinforced by additional diagonal support.
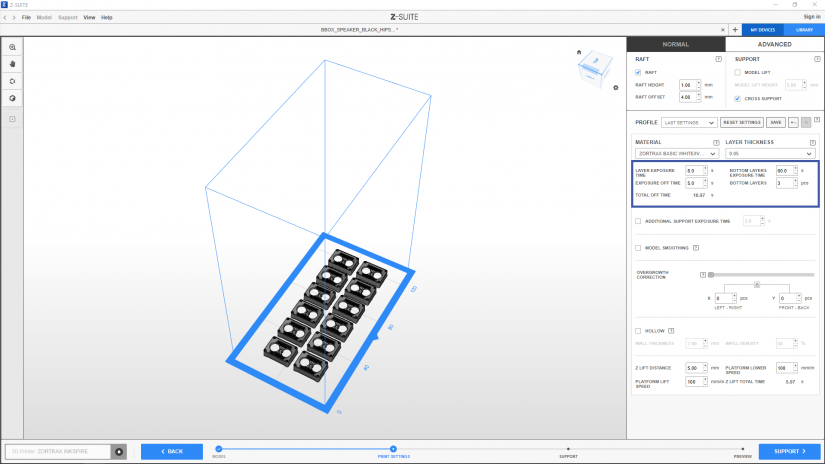
3. Next, you can adjust all settings connected with resin curing times:
Layer exposure time - this parameter determines the time during which layers will be cured with the UV light,
Exposure off time - this parameter determines the time during which layers will not be cured with the UV light,
Bottom layers exposure time - this parameter determines the time during which bottom layers will be cured with the UV light. Longer curing times improve model's adhesion to the platform.
Bottom layers - this parameter allows you to choose the number of bottom layers. Choosing a higher number of bottom layers is recommended for bigger models.
Total off time - this value equals to Exposure off time and Z lift total time combined (the platform's up and down movement).
1. In the Advanced print settings menu, you can enable or disable printing the raft and customize its settings: Raft height and Raft offset.
The Raft offset option allows you to determine the size of the area underlying a single pillar of support. More details on adding support structures in the UV LCD technology can be found in the Support Adjustments article.
2. In the Support section, you can adjust additional settings connected with support structures:
Model lift - this parameter determines the distance between a model and the platform. Once you select this option, select at what height you want to your model to be lifted. Remember to add support under the model in the Support step.
Cross support - if you select this option, support structures in your model will be reinforced by additional diagonal support.
3. Next, you can adjust all settings connected with resin curing times:
Layer exposure time - this parameter determines the time during which layers will be cured with the UV light,
Exposure off time - this parameter determines the time during which layers will not be cured with the UV light,
Bottom layers exposure time - this parameter determines the time during which bottom layers will be cured with the UV light. Longer curing times improve model's adhesion to the platform.
Bottom layers - this parameter allows you to choose the number of bottom layers. Choosing a higher number of bottom layers is recommended for bigger models.
Total off time - this value equals to Exposure off time and Z lift total time combined (the platform's up and down movement).

1. Additional support exposure time - this parameter determines additional curing time for support structures. Longer curing times make support structures more durable.

2. Model smoothing - once this option is selected, the pixels on the edges of images displayed on the LCD screen will be smoothed using the anti-aliasing method. However, model smoothing may cause dimensional inaccuracy. Avoid using this option while printing engineering or dental models.
1. Additional support exposure time - this parameter determines additional curing time for support structures. Longer curing times make support structures more durable.
2. Model smoothing - once this option is selected, the pixels on the edges of images displayed on the LCD screen will be smoothed using the anti-aliasing method. However, model smoothing may cause dimensional inaccuracy. Avoid using this option while printing engineering or dental models.
3. The Overgrowth correction option allows you to correct your model’s outer dimensions and enlarge holes (1 pixel decreases dimensions on both sides by 0.1 mm in total). The actual value of the correction depends on the type of resin and the level of its shrinkage.
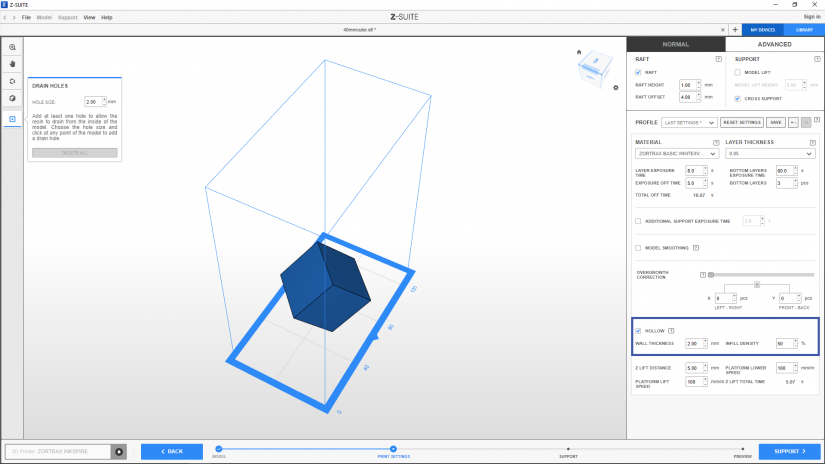
1. The Hollow option allows you to save liquid resin by making a model empty inside. Adjust the Wall thickness and then adjust the Infill density which will strengthen your object.
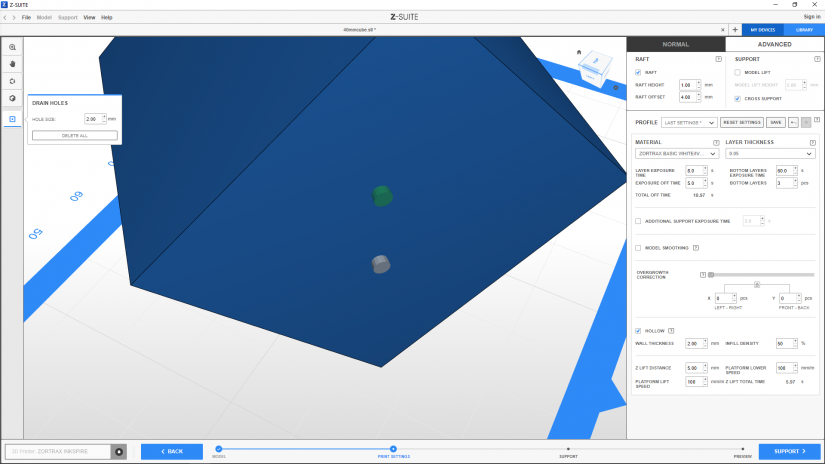
2. Next, it is necessary to add one or more drain holes in the menu on the left. Drain holes allow the resin to drain from the inside of the model. Choose the Hole Size and click on any point of the model to add a hole.
3. Z lift distance - this parameter determines the height at which the platform is lifted after each cured layer,
Platform lift speed - this parameter determines the speed at which the platform is being lifted during the printing process,
Platform lower speed - this parameter determines the speed at which the platform is being lowered during the printing process
Z lift total time - this parameter determines the time during which the platform will make an up and down movement after each cured layer.
1. The Hollow option allows you to save liquid resin by making a model empty inside. Adjust the Wall thickness and then adjust the Infill density which will strengthen your object.
2. Next, it is necessary to add one or more drain holes in the menu on the left. Drain holes allow the resin to drain from the inside of the model. Choose the Hole Size and click on any point of the model to add a hole.
3. Z lift distance - this parameter determines the height at which the platform is lifted after each cured layer,
Platform lift speed - this parameter determines the speed at which the platform is being lifted during the printing process,
Platform lower speed - this parameter determines the speed at which the platform is being lowered during the printing process
Z lift total time - this parameter determines the time during which the platform will make an up and down movement after each cured layer.
Slicing a Model

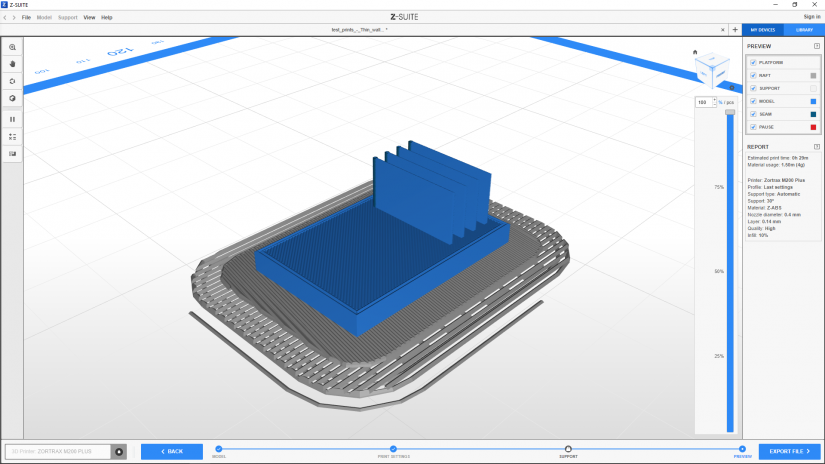
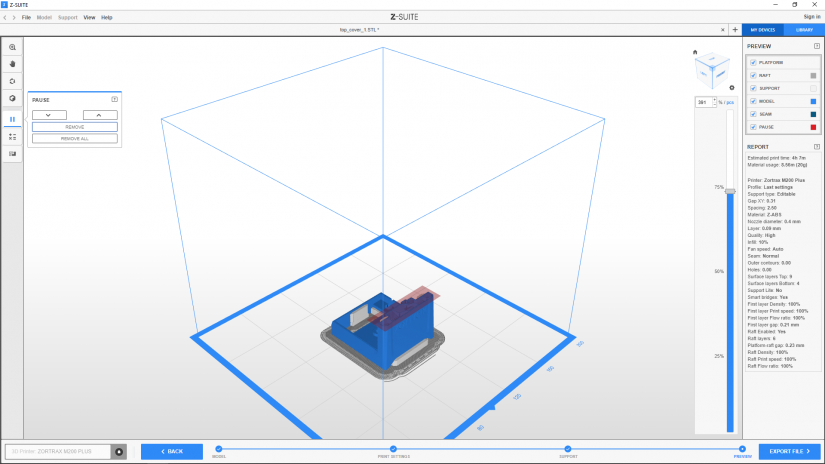
1. Once you click Preview, Z-SUITE will begin to slice your model and generate the .zcode/.zcodex. The program will show information on the estimated print time, material usage and print settings on the right side of the screen. Use the menu in the top right corner of the window to see each component of the .zcode/.zcodex separately.
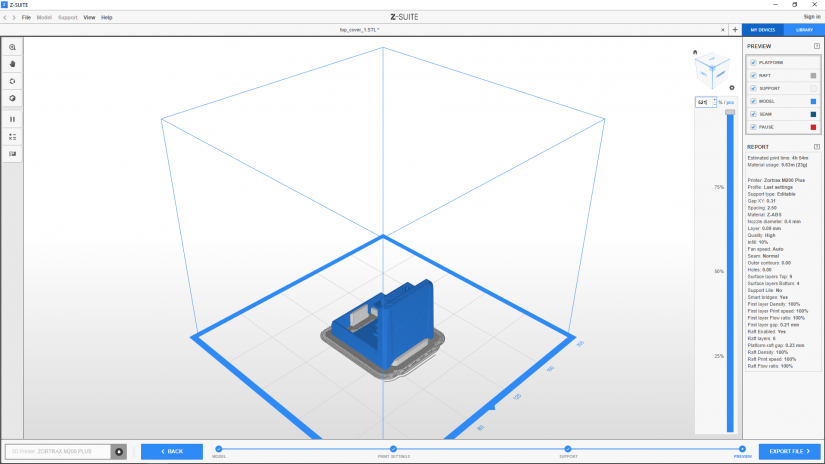
2. Once the .zcode/.zcodex has been prepared, you can see how many layers have been generated by clicking the % button. The box next to the bar will show you the exact number of layers in your model.
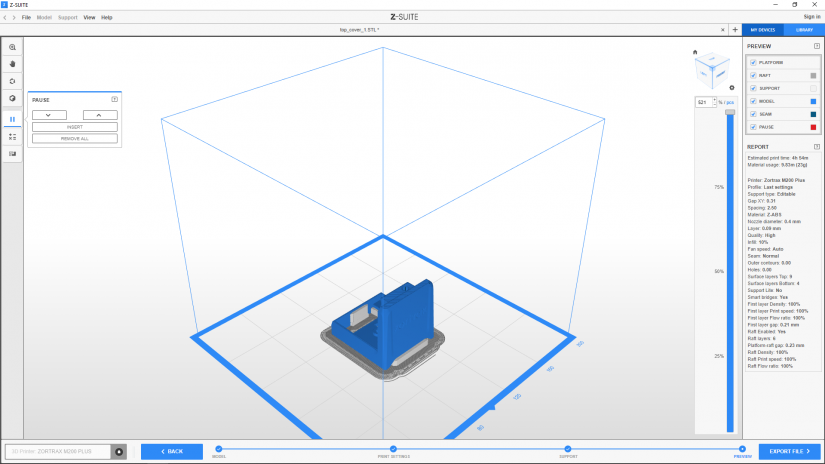
3. The Edit Pause option on the left menu bar allows you to divide the printing process into stages and hold it in order to change the material. To plan a pause, move the slider onto a desired layer or use the "+"/"-" buttons on the bar on the right.
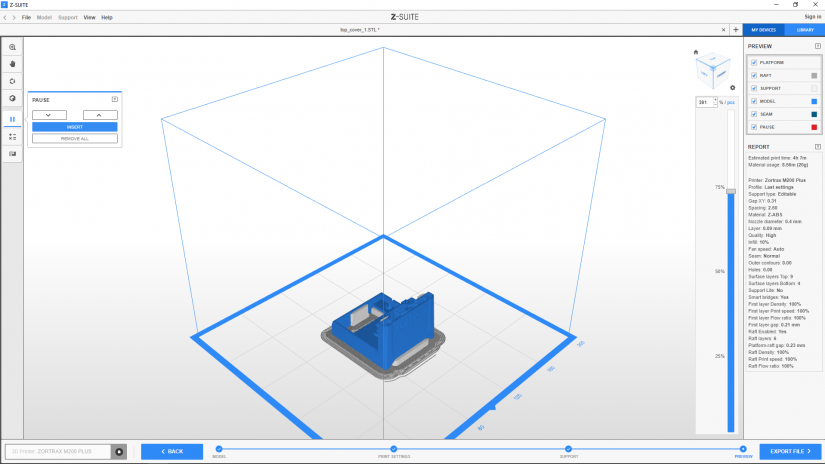
4. Click Insert to set the pause in the chosen place. You can use this function several times to plan multiple pauses during one print.
1. Once you click Preview, Z-SUITE will begin to slice your model and generate the .zcode/.zcodex. The program will show information on the estimated print time, material usage and print settings on the right side of the screen. Use the menu in the top right corner of the window to see each component of the .zcode/.zcodex separately.
2. Once the .zcode/.zcodex has been prepared, you can see how many layers have been generated by clicking the % button. The box next to the bar will show you the exact number of layers in your model.
3. The Edit Pause option on the left menu bar allows you to divide the printing process into stages and hold it in order to change the material. To plan a pause, move the slider onto a desired layer or use the "+"/"-" buttons on the bar on the right.
4. Click Insert to set the pause in the chosen place. You can use this function several times to plan multiple pauses during one print.
5. Click Remove All to remove all pauses from your print.
