The nozzle is the component used to direct a flow of material throughout the entire printing process, allowing the printer to form the desired shape of a model. If you encounter problems with extrusion during either material loading or printing, the nozzle may be clogged and require cleaning or even replacement. Also, the nozzle needs to be replaced if you notice burn marks or a visible lack of material in your print’s structure. Cleaning the nozzle in acetone is a way to keep it in good condition and extend its life span.
| The following manual shows the M200 maintenance work. For the M300, these procedures are the same. |
Scrubbing the Nozzle
Take the spatula from the Starter Kit and gently scrub the nozzle to remove material remains.
Unclogging the Nozzle
From the menu choose “Material” and then “Load the material” option. Follow the instructions displayed on the screen.
Use the pliers from the Starter Kit to hold a needle. As soon as the printer starts to load the material, insert the end of the needle into the nozzle to unclog it.
If that doesn’t help, follow the rest of the steps from this manual.
Unloading the Material
From the menu choose “Material” and then “Unload the material” option. The extruder should start to heat up automatically. Once the extruder is hot, the motor will start to unload the material.
Nozzle Removal
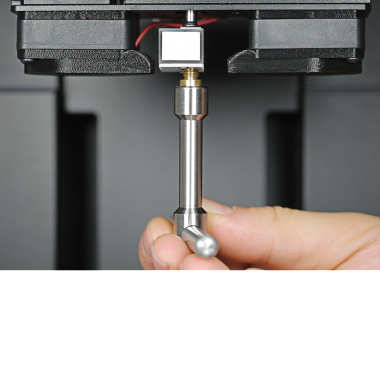
Unscrew the nozzle counterclockwise (when viewed from below). Use the nozzle key from the Starter Kit box. Removing the nozzle should take place while the extruder is still hot. When the nozzle is loose, remove it using pliers.
Unplugging the Power Cable
Turn off the printer and unplug the power cable. Wait about 15 minutes and let the machine cool down.
Cleaning the Nozzle
If you were printing with Z‑GLASS / Z‑PETG / Z‑PCABS / Z-ESD, print a small-sized object using Z‑ABS. This will help to extrude material remains from the nozzle.
Using the pliers, place the nozzle in a container filled with acetone.
Removing the Nozzle from the Container
After 8-10 hours take the nozzle out of the container with pliers.
Nozzle Assembly
Install the nozzle in its place in the hotend and screw it in clockwise using the nozzle key (when viewed from below).


