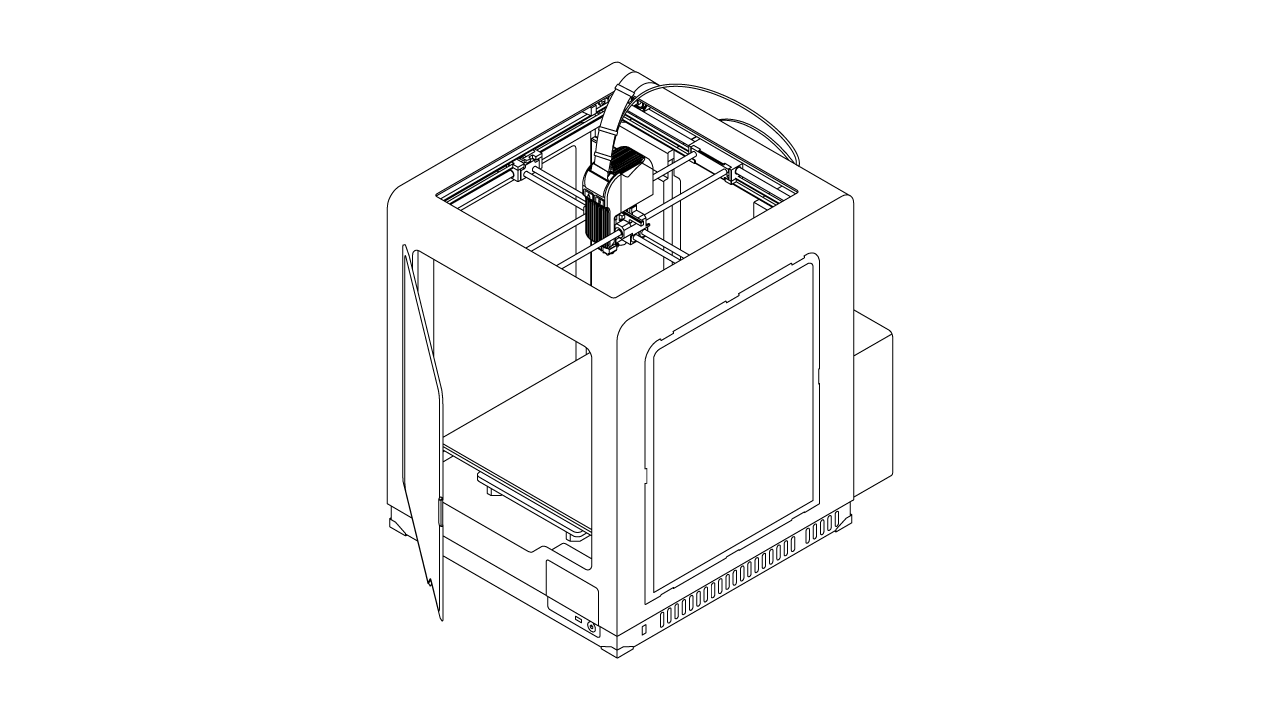
Maintenance work should be regular in order to keep the printer in good condition and achieve high quality prints every time. Some parts require maintenance before each print and some every few hundred working hours. All maintenance activities do not take much time and are not complicated. Before commencing any repair, it is important to turn off the printer and let it cool down. Remember to always wear gloves and glasses.
The following tables present maintenance and repair guidelines connected with each section of the Zortrax M300 Dual, together with specific check points, necessary activities and their frequency.
Main
| ACTIVITY | FREQUENCY | SOLUTIONS TO THE PROBLEMS | NECESSARY ACCESSORIES |
| Cleaning the machine, its interior and surroundings, especially the bottom plate under the platform | Before each printing process | To remove material remains from the interior of the device, use a vacuum cleaner or compressed air | – a vacuum cleaner, – cleaning products with a high evaporation rate |
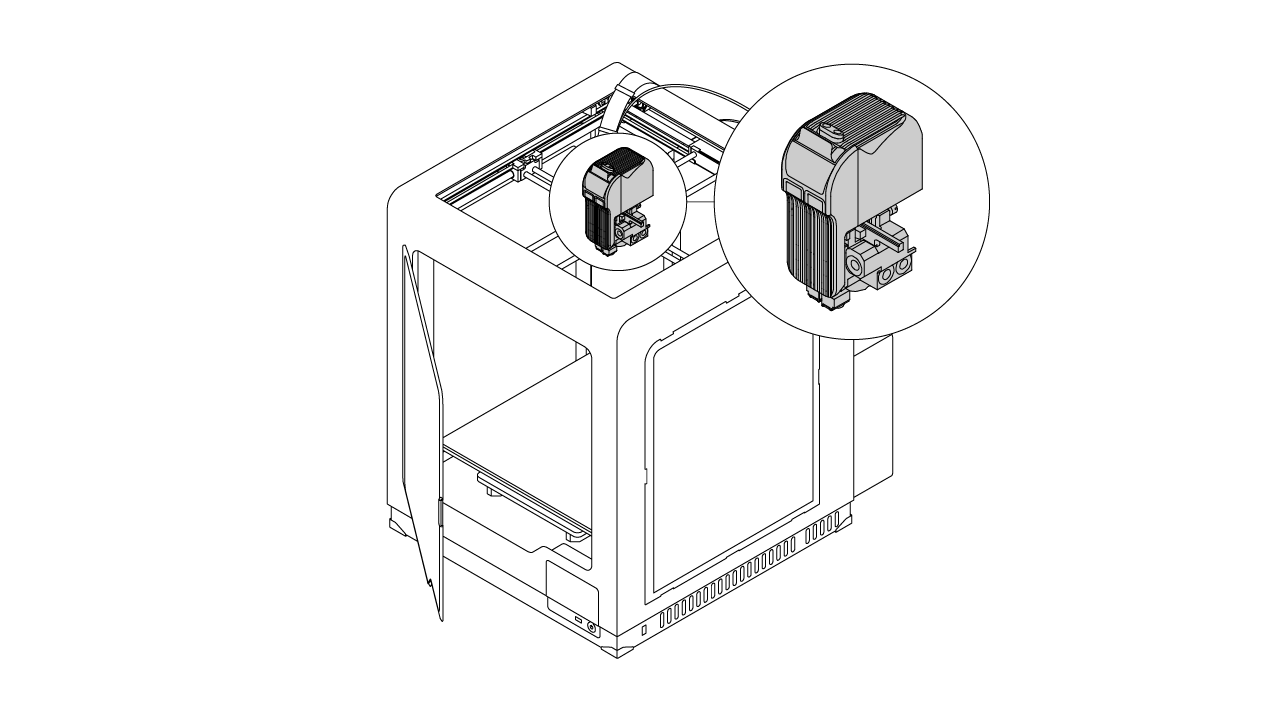
Hotends
| ACTIVITY | FREQUENCY |
| Checking if the hotends and nozzles are not clogged | Before each printing process |
| Cleaning the nozzles | After finishing one spool of material |
| Checking if the screws that secure the heater and thermocouple are tightened (in both hotends) | Every 300 working hours |
Platform
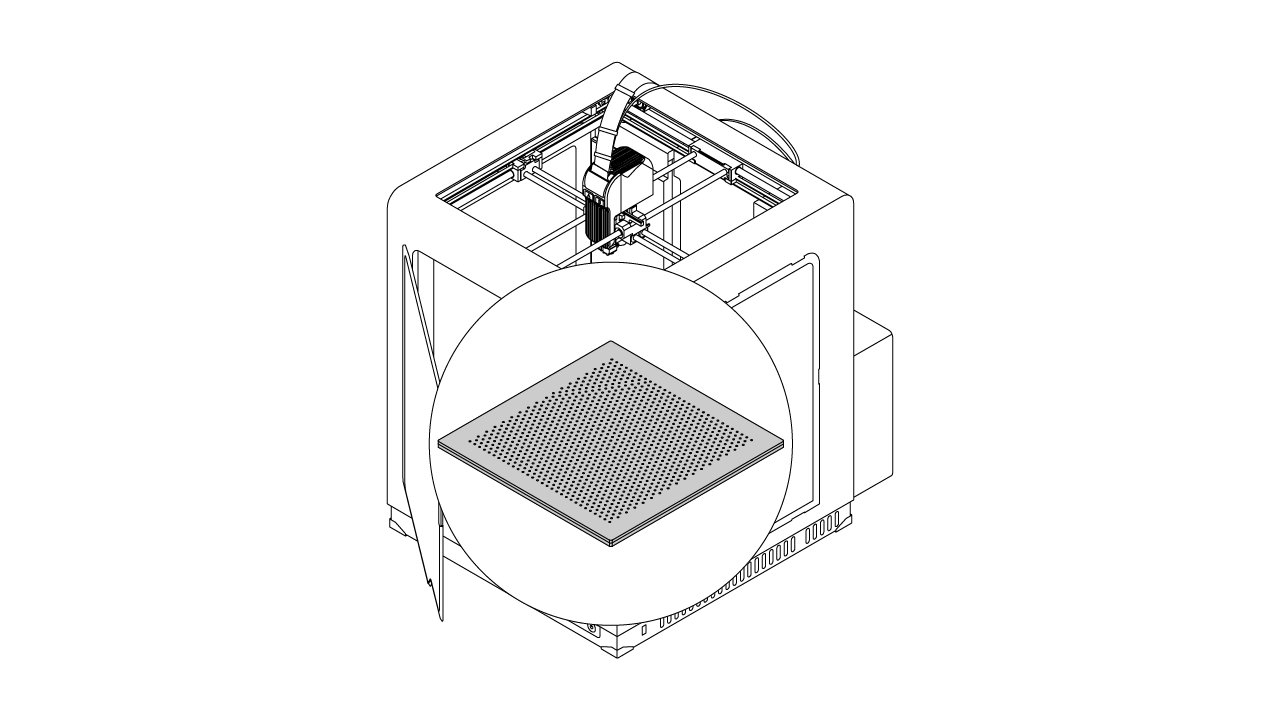
| ACTIVITY | FREQUENCY | SOLUTIONS TO THE PROBLEMS | NECESSARY ACCESSORIES |
| Cleaning the perforated plate | Before each printing process | To remove material remains from the surface of the perforated plate, use a spatula | – a spatula |
| Checking the perforated plate for deformation | Before each printing process | – | – |
| Calibration | Every 200 working hours | If the platform calibration fails, move on to the next step indicated in this table | – |
| Cleaning the heatbed and the underside of the perforated plate | Every 300 working hours | Unscrew the screws that secure the perforated plate and remove the residues from the underside of the plate using a spatula. The heatbed needs to be cleaned with a piece of cloth damped in acetone | – a spatula, – a piece of cloth, – acetone |
| Checking if the clips that secure the glass plate to the heatbed are properly installed and if the screws that secure the clips are tightened | Every 200 working hours | – | – a 2 mm Allen key |
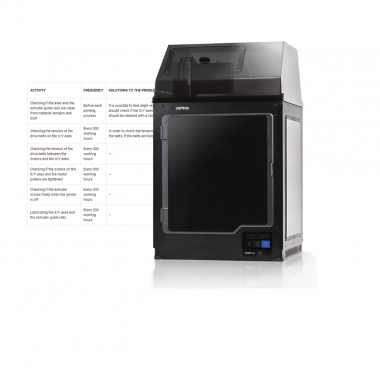
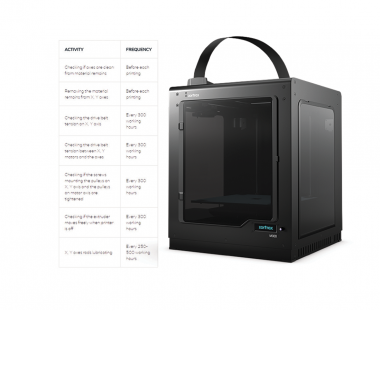
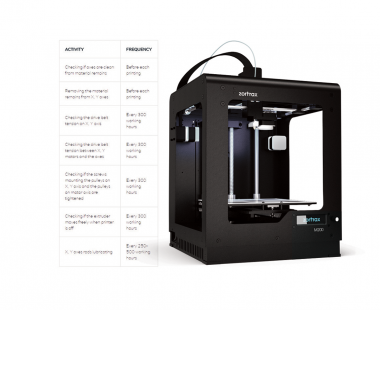
X/Y Axes; Extruder Guide Rails
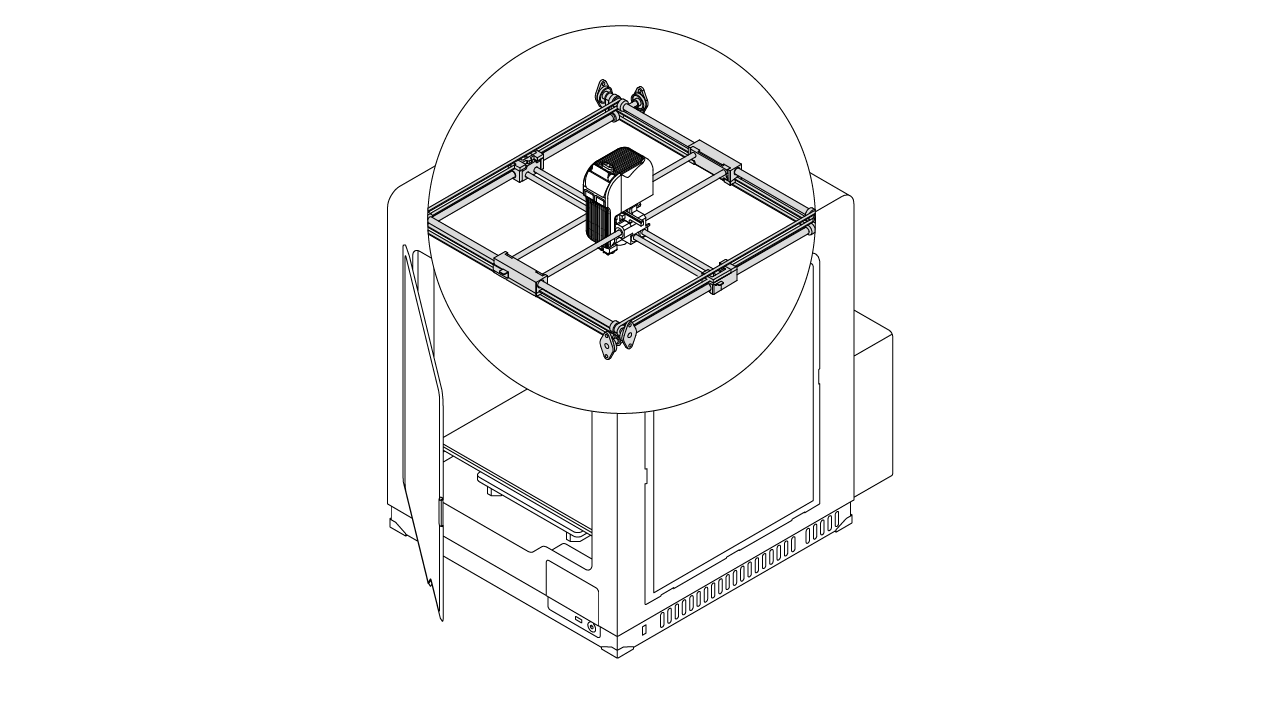
| ACTIVITY | FREQUENCY | SOLUTIONS TO THE PROBLEMS | NECESSARY ACCESSORIES |
| Checking if the axes and the extruder guide rails are clean from material remains and dust | Before each printing process | It is possible to feel slight resistance while checking if the extruder moves freely on the guide rails. In such case you should check if the X/Y axes and the extruder guide rails are covered with black grime. The axes and guide rails should be cleaned with a cloth damped in acetone and then lubricated with silicone oil | – silicone oil |
| Checking the tension of the drive belts on the X/Y axes | Every 300 working hours | In order to check the tension of the drive belts on the X/Y axes, move the extruder to the central point and gently tug the belts. If the belts are loosened, tighten the screws placed on the top part of the X/Y axes blocks | – |
| Checking the tension of the drive belts between the motors and the X/Y axes | Every 300 working hours | – | – |
| Checking if the screws on the X/Y axes and the motor pulleys are tightened | Every 300 working hours | – | – |
| Checking if the extruder moves freely when the printer is off | Every 300 working hours | – | – |
| Lubricating the X/Y axes and the extruder guide rails | Every 300 working hours | – | – silicone oil |
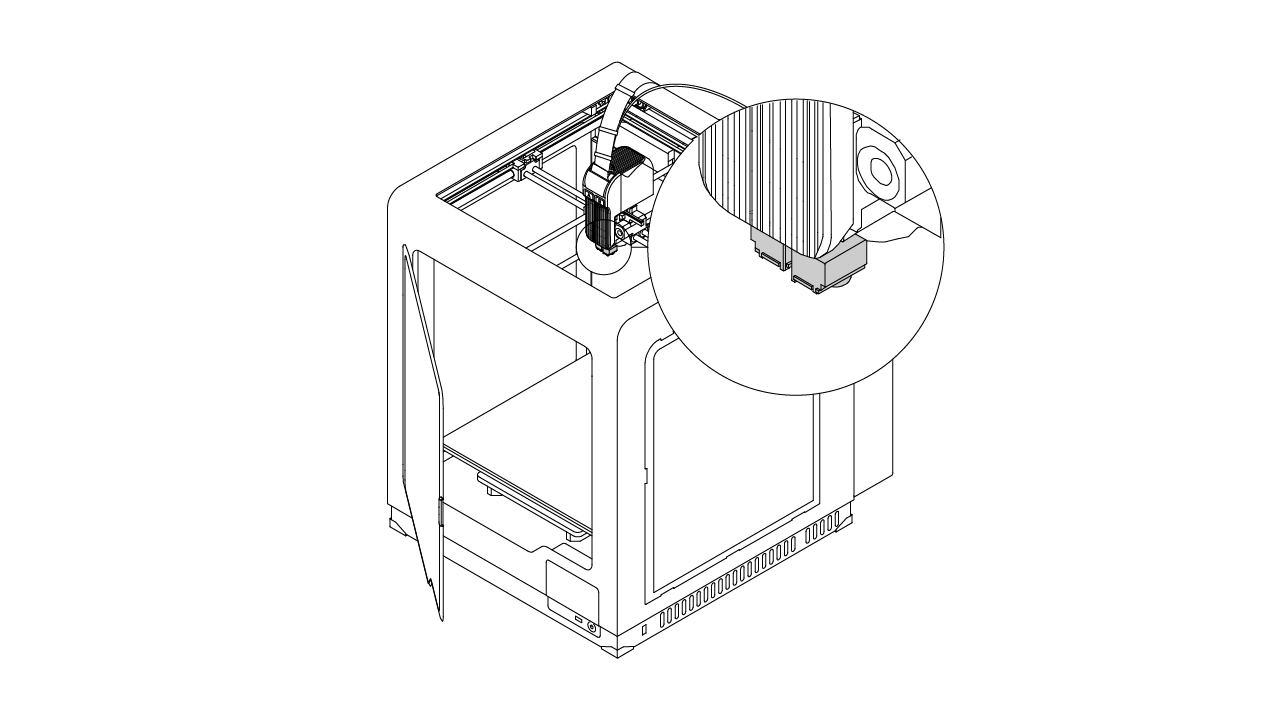
Extruder
| ACTIVITY | FREQUENCY |
| Checking if the extruder top cover and material guides are properly installed | Before each start-up of the printer |
| Checking if both material guides are properly secured to the extruder cable with the material guide clamps | Before each start-up of the printer |
| If you use the HEPA Cover, check if it does not press the extruder cable | Before each start-up of the printer |
| Checking if the extruder cable is properly plugged into the extruder PCB | Every 300 working hours |
| Checking if the extruder PCB is properly secured to the extruder block | Every 300 working hours |
| Checking if the pins on the extruder cable connector are clean | Every 300 working hours |
| Checking if the screws that secure the hotends are not loose, and, if necessary, tightening them | Every 300 working hours |
| Removing the material remains and lumps from the extruder | Every 300 working hours |
| Checking if the fans are working | Every 300 working hours |
| Checking if the screws that secure the fan shroud on the extruder are tightened, and if it’s necessary, tighten them | Every 300 working hours |
Suggested Part Replacement Time
The table shows approximate replacement time of components that are exposed to natural wear and tear. In order to maintain the printer in good condition and to provide the highest priting quality, it’s advisable to replace particular components after an appropriate period of time indicated in the table.
NOTE! The lifespan of particular components highly depends on the type of filaments you use most often.
| Nozzle | Hotend | Perforated Plate | Extruder Cable | Extruder Fans 40×40 |
| Every 300 working hours | Every 400 working hours | Every 700 working hours | Every 500 working hours | Every 500 working hours |