The extruder top cover V2 features enhanced functionalities of the extruder cover V1. The modernized version of the cover provides even more protection to the extruder cable. Thanks to the fastener included in the upper part of the cover, the extruder cable is tightly secured, right next to its connector where severe deformation can occur during the printing process. Also, the extruder top cover V2 makes material feeding easier through the redesigned hole for the material guide.
We highly recommend replacing the cover V1 with the cover V2. First, you need to 3D print the model available: here and follow these steps to upgrade the extruder top cover from V1 to V2.
| The following manual shows the M200 repair work. For the M300, these procedures are the same. |
Unloading the Material
From the menu choose “Material” and then “Unload the material” option. The extruder should start to heat up automatically. Once the extruder is hot, the motor will start to unload the material.
Unplugging the Power Cable
Turn off the printer and unplug the power cable.
Unplugging the Extruder Cable
Unplug the extruder cable.
Extruder Upper Printed Cover V1 Removal
Detach the extruder upper printed cover V1 from the extruder.
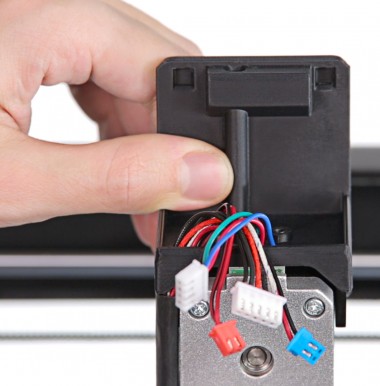
Unplugging all Cables from the Extruder PCB
Unplug all the cables from the extruder PCB.
Unscrewing the Extruder PCB
Unscrew the two screws that secure the extruder PCB using a 2mm Allen key. Remove the PCB from the extruder.
Extruder Lower Printed Cover V1 Removal
Remove the extruder lower printed cover V1.
Extruder Lower Printed Cover V2 Assembly
Attach the extruder lower printed cover V2 to the extruder.
Extruder PCB Assembly
Place the extruder PCB in its place and secure it with the two screws.
Plugging all Cables into the Extruder PCB
Plug all the cables in. Remember to arrange the cables so that they don’t get damaged, e.g. by wrapping against each other.
Plugging the Extruder Cable
Plug the extruder cable in.
Material Guide Assembly
Attach the material guide to the extruder cover V2.
Extruder Upper Printed Cover V2 Assembly
Attach the extruder upper printed cover V2 to the lower cover.
Plugging the Power Cable
Plug the power cable in.